Follow us
  • Home
  • HOLIDAY GIFT GUIDE! 2018
    • HOLIDAY GIFT GUIDE! 2017 >
      • HOLIDAY GIFT GUIDE! 2016 >
        • Holiday Gift Guide! 2015 >
          • Holiday Gift Guide! 2014 >
            • 2013 Holiday Gift Guide!
  • More About Us
    • HEALTH
    • My Weight loss Journey/the Journey Gym Video Blog
    • Creative Bioscience 90-day-weight-loss-challenge
    • Pregnancy & Infant Loss Remembrance
    • Someone I ♥ has Autism (My Little Girl Amelia)
    • Stop Child and Adult Abuse
    • Memorial Page to Richard Thomas Eagle
  • PR / Media Kit
    • Contact
  • Disclosure Policy
  • My Art Work
  • Crafts / DIY
    • DIY for the home
    • Crafts for Kids & Adults
  • Food & Recipes
    • Breakfast
    • Lunch >
      • Healthy Soups
      • Soups
    • Dinner >
      • Snacks & Side Dishes
      • Crock Pot Meals >
        • Casserole Dishes
    • Dessert & Goodies >
      • Drinks,Soda Fountian & Cool Treats

Make a planter with 2-liter bottles & cd's & the stone spray paint

3/17/2013

0 Comments

 
Picture
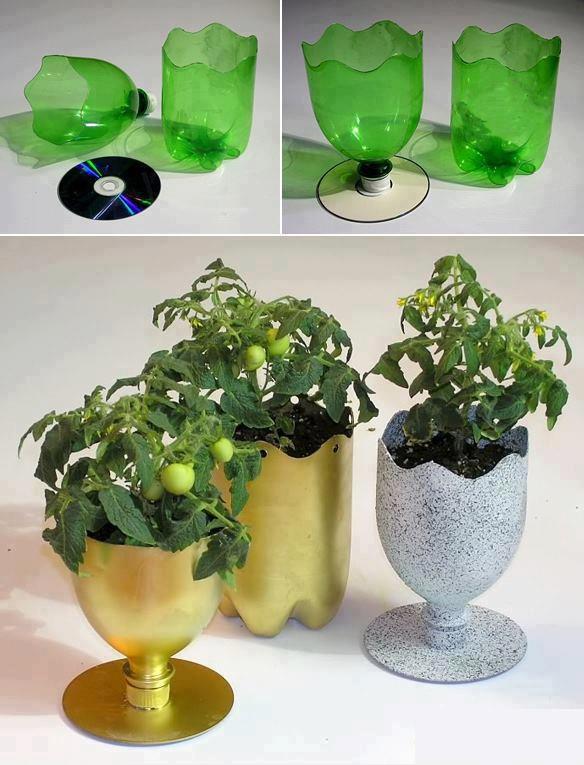
Cool idea for a planter with 2-liter bottles & cd's & the stone spray paint one is really nice !!
0 Comments

Winnie the Pooh Paper Lantern

8/19/2012

3 Comments

 
Picture
Ages All Ages


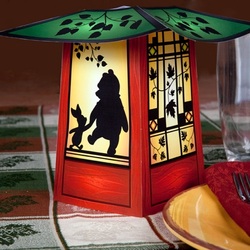
This adorable Winnie the Pooh paper lantern features the cuddly bear and his pal Piglet walking through the Hundred Acre Wood.
 
Download the Winnie the Pooh Lantern Template
http://spoonful.com/sites/default/files/winnie-the-pooh-paper-lantern-printable-0811.pdf
 
How to make it
  1. Print the template on regular paper or cardstock and cut out the pieces. Make all folds along dashed lines.

  2. Using glue or double-sided tape, secure the panels to each other with the large tabs. Make sure the character panels are positioned opposite each other.

  3. Secure the two top pieces, then use the tabs at the top of the four panels to attach the top of the lantern to the base


3 Comments

Pooh's Letter Ladder Wall Hanging

8/19/2012

0 Comments

 
Picture
Total Time 2 3 Hours Ages Ages 5 8 
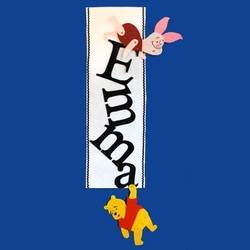
When Pooh and his friends find themselves trapped in a hole they devise a creative way to climb out -- by building a ladder with oversized letters. Craft this adorable, personalized name banner depicting Pooh and his friend Piglet climbing their way out of a sticky situation. 

Download Pooh's Wall Hanging Templatehttp://spoonful.com/sites/default/files/poohs-wall-hanging-character-templates.pdf 
Download Pooh's Wall Hanging Template 2
http://spoonful.com/sites/default/files/poohs-wall-hanging-letter-templates.pdf 

What you'll need
  • Printable Pooh & Piglet templates
  • Printable alphabet template
  • White felt -- 8.5 inches wide and 2-3 feet long (will depend on the length of your child's name)
  • Decorative brads -- 3 yellow, 4 red (found at craft stores)
  • Stiffened felt -- 9 x 12-inch pieces in black, light pink, dark pink, dark red, bright red, and golden yellow
  • Scissors
  • Pencil
  • Ruler or tape measure
  • Black marker
  • Fabric or tacky glue
  • Hot glue
  • Ric-rac or ribbon, for trim
  • Thumbtacks, for hanging on the wall

How to make it
  1. First, use the alphabet template to print the letters that spell your child's name. Trace the letters onto stiffened black felt and cut them out. You should be able to fit 2 - 3 letters on each piece of felt.

  2. Lay the letters vertically on a flat surface, creating a staircase or ladder with the letters. The bottom edge of each letter should touch the top corner of the letter that follows it.

  3. Once the letters are laid out, measure the length from bottom to top using your ruler or tape measure. Add 5 inches to your final measurement. This will determine the length of your white felt banner. Measure the white felt and cut it to the desired length. Set aside the letters and the white felt.

  4. To Make Pooh:

    Now, print the Pooh and Piglet character templates.

  5. Cut out the Pooh template pieces and trace each piece onto the colored felt specified. (Pooh will have a yellow body, and his shirt pieces will be bright red.)

  6. Lay the Pooh pieces out in front of you. Use fabric glue to secure his shirt to his body, and his sleeve to his arm. Let dry.

  7. You will need 3 yellow brads and one red brad to put Pooh together. Place one of Pooh's legs on his lower torso, with the round end on top of his body. Use scissors to make a small snip in the leg and torso, then push a yellow brad through. Fold the ends of the brad outward to secure.

  8. Place Pooh's other leg on the other side of his torso, with his body overlapping the rounded end of the leg. Make a small snip in his body and leg so that you can push a yellow brad through, then secure.

  9. Finally, attach Pooh's arm with the rounded end underneath his upper torso. Use scissors to make a small snip though his shirt and arm. Use a red brad to secure.

  10. Pooh will hang from the last letter in your child's name. Use a yellow brad to connect Pooh's hand to the corner of the last letter.

  11. To Make Piglet:

    Cut out the Piglet template pieces and trace each piece onto the colored felt specified. (Piglet will have a light pink body, a dark red shirt, and dark pink ears and snout.

  12. Lay the Piglet pieces in front of you. Use fabric glue to attach Piglet's ears to his head, and his shirt to his body. Let dry.

  13. To attach Piglet's legs, place one leg underneath Piglet's body, and the other on top of his body. Using scissors, make a small slit in each piece of felt and push the red brad through all three pieces; fold the brad outward to secure.

  14. Use the same method to attach Piglet's arms -- sandwich his body between each arm, push a red brad through, and secure by folding the brad outward.

  15. Piglet will lie on top of the first letter of your child's name. Push a red brad through Piglet's torso and through the top of the first letter.

  16. Glue on Piglet's pink snout, then use a marker to draw Pooh and Piglet's facial features. You can use the last page of the Pooh & Piglet character templates as a guide.

  17. Now, use hot glue to attach the letters to the white felt banner. Be sure that Pooh hangs from the bottom of the banner.

  18. Glue the center of Piglet's torso to the banner -- not his arms and legs. The brads will allow you to pose his arms and legs.

  19. Glue ric-rac or ribbon to the edges of the banner for decoration.

  20. Hang the banner on your child's wall or door using thumbtacks. 


0 Comments

No-Sew Pillowcase Skirt

8/19/2012

0 Comments

 
Picture
Total Time 1 2 Hours Ages School Age
Trendsetters won't be able to resist the creative trick of transforming a pillowcase into a sassy skirt (or beach cover-up). Be sure that the case your child chooses won't be see-through, and consider that cases with a decorative edge offer a fabulous instant hem detail. If the case is brand new, preshrink it before you begin.


What you'll need
  • Pillowcase
  • Yardstick
  • Tailors' chalk or a pencil
  • Scissors
  • Small paintbrush
  • Washable fabric glue (available at craft stores; we used Fabri-Tac glue)
  • Clear nail polish
  • Safety pin
  • 45-inch cotton drawstring

How to make it
  1. Decide on the length (one way is to measure the length of a skirt your child likes). Add 1 1/2 inches for a casing to that measurement. Use that total to measure from the open edge of the pillowcase (which will be the hem) and use tailor's chalk or a pencil and a yardstick to mark a straight line across the case. Cut along the line. Discard the closed end of the pillowcase. Turn the skirt piece inside out.

  2. Iron (adult supervision recommended) down 1/2 inch along the cut edge.

  3. Along the same edge, iron down an additional 1 inch.

  4. Place cardboard under the pillowcase to protect the ironing board from potential glue spills. Lift the casing and use a small brush to apply washable fabric glue (adult supervision recommended) along the 1/2-inch edge of the casing. (Tip: This is easy if you drape the skirt around the ironing board and rotate it as you go.) Fold the glued edge back down to form the casing. Use your fingers to press it in place. After the glue dries, turn the skirt right side out.

  5. At the center front of the casing, apply a line of clear nail polish (supervise younger kids). Let it dry and reapply.

  6. When the second coat is dry, cut a slit for the drawstring. Be sure to go through just 1 layer of fabric, and stay within the boundaries of the polish.

  7. Attach a safety pin to one end of the drawstring and feed it through the casing. Knot the ends of the drawstring, and the skirt's ready to wear.


0 Comments

Winged Wonders

8/19/2012

0 Comments

 
Picture
Total Time 1 Hour Ages School Age 


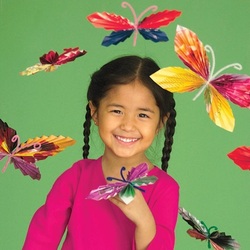
What makes these fluttery butterflies so vibrant? Magazine photos!


What you'll need
  • Colorful magazine pages
  • Pipe cleaners

How to make it
  1. For each butterfly, choose 2 colorful magazine pages. Cut out 2 squares, one 5 inches on a side, the other 4.

  2. Starting at one corner, accordion-fold the squares on their diagonals; our folds were 1/4 inch each.

  3. Pinch the center of each folded square. Bend a 12-inch pipe cleaner in half and create a small loop. Arrange the squares in a butterfly shape and center them inside the pipe cleaner.

  4. To secure the wings, twist the pipe cleaner above and below the wings and curl the ends for antennae.


0 Comments

Magazine Holder

8/19/2012

0 Comments

 
Picture
Total Time 1 2 Hours Ages School Age 
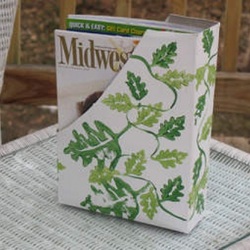
Don't throw away your kids' old cereal boxes! Turn them into attractive magazine holders with this handy Earth Day craft.


What you'll need
  • Empty cereal box
  • Scissors
  • White acrylic paint or spray paint
  • Light green and dark green acrylic paint
  • Sponge or leaf shaped foam stamp
  • Thin paint brush
  • Sand paper or gesso/craft medium (we used Liquitex Basics Gesso)

1. Any kind of decorating technique can be used. (Decoupage, glued fabric scraps, children can do this!) 2. Try to decorate the front of the boxes so when lined up they all coordinate with each other. 3. Use heavier detergent boxes so the boxes will be sturdier and hold up to younger children messing with them.


How to make it
  1. Cut off top of cereal box. Halfway across top of box, cut at a 45 degree angle down to front of your magazine holder, cut straight across then back up other side at the same angle.

  2. Lightly sandpaper outside of cereal box. (They are usually shiny, coated paper.) Alternatively you can paint a layer of gesso all over the box. Either one of these methods will help the paint adhere to the box.

  3. Spray paint the box white, or paint on with inexpensive sponge brush. Let dry.

  4. Cut out leaf shape from sponge or use a leaf shaped foam stamp.

  5. Pour out small amount of green paints.

  6. Use thin paint brush to add a swirled line all over the box, this is the vine.

  7. Sponge paint (or use foam stamp) green leaves on front of box leading to sides of box. First the darker, for background leaves, then lighter for foreground leaves.

  8. If painting more than one box, try to connect vines on each box so when set together they will match.


0 Comments

Talking Doorknob

8/19/2012

2 Comments

 
Picture
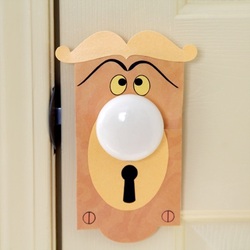
Total Time 30 Minutes Or Less Ages School Age Take it from the talking doorknob Alice encountered in Wonderland, "One good turn deserves another." Made in the whimsical knob's likeness, this colorful paper doorknob plate is a handy prop for surprising your child and reciprocating for past April Fools' pranks! 

Download the Talking Doorknob Template
http://spoonful.com/sites/default/files/april-fools-talking-doorknob-craft-template-0311.pdf 
What you'll need
  • Talking Doorknob Template
  • Scissors
  • Craft or scrapbook paper (black and two shades of yellow or gold)
  • Glue stick
  • Tape or removable glue dots

How to make it
  1. Print the template and use it to cut out the shapes from the specified colors of paper. (Do not cut out the center hole in the doorknob plate yet.)

  2. Glue the keyhole plate to the doorknob plate, positioning it about 2 inches from the top and 1¼ inches from the bottom.

  3. Place the doorknob plate template piece atop the assembled gold paper door plate and now follow the lines to cut out the center hole, as shown.

  4. Fold back the side tab on the plate. Then glue the plate trim in place.

  5. Glue on the keyhole "mouth," eyes, eyebrows, and screws.

  6. Once you've chosen a doorknob to hang the plate on, gently separate the paper at the slit on the side and slide the plate onto the knob base. Then secure the tab to the back of the plate with a removable glue dot.


2 Comments

Enchanted Spoons and Spatulas

8/19/2012

0 Comments

 
Picture
Total Time 1 2 Hours Ages School Age 


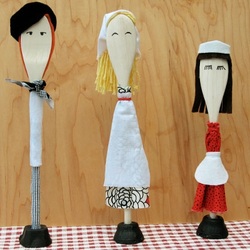
With talking clocks and dancing spoons and plates, it didn't take long for Belle to realize that nothing is as it seems in an enchanted castle. With this craft, kids can get creative transforming kitchen implements into cooks, maids, and other staff members they might imagine a prince-turned-beast would employ.


What you'll need
  • Craft knife
  • Cardboard egg carton cup
  • Black acrylic paint or craft paint
  • Paintbrush or foam brush
  • Wooden spoon or spatula
  • Scissors
  • Felt scraps or yarn
  • Hot glue gun or tacky glue
  • Fabric scraps (white and assorted colors and prints)
  • Yarn or embroidery floss
  • Pencil
  • Black fine-tipped permanent marker

How to make it
  1. Start by making a stand for the spoon or spatula. Evenly trim the top of the egg carton cup. Then, turn it upside down and use the craft knife to cut an asterisk-shape in the bottom. Paint the outer surface of the cup black and set it aside to dry.

  2. Next, cut out a wig of felt to fit the bowl of the spoon or spatula, as shown, and glue it in place. To add bangs, glue a fringed felt semicircle to the front of the spoon. If you'd rather make a yarn wig, simply gather together a few dozen strands and tightly tie another strand around the middle of the bunch.

  3. For a maid's outfit, fashion a dress by loosely wrapping fabric around the spoon handle and tying yarn or embroidery floss around the neck to secure it. Add a white fabric or felt apron. Then tie a white fabric kerchief around the hair, or glue on a white felt maid's hat. To outfit a chef, create pants by tightly wrapping fabric around the lower spoon or spatula handle and gluing down the edge of the cloth. Loosely wrap and tie a white fabric jacket around the upper handle, and then add a neck bandanna. For a chef's beret, cut out two 2 1/2-inches-wide black felt circles. Cut a slit in the center of one circle. Then glue the two circles together along the edges. Insert the top of the spoon or spatula into the slit.

  4. Pencil facial features on the face of the spoon or spatula. Once you have them the way you like, trace over the lines with black permanent marker.

  5. Insert the spoon or spatula handle into the stand. It should fit snugly; if not, apply a little glue around the opening.


0 Comments

Sunshine Craft

8/19/2012

0 Comments

 
Picture
Ages Ages 5 8 
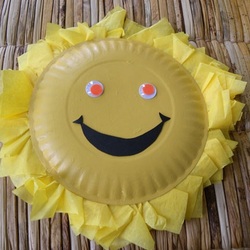
This fun craft idea works equally well for a pool party, or as a great rainy day project to encourage the sun to come back and shine. Bring a little bit of that summer sunshine inside with the Sunshine Craft. When you're done you'll have a fun smiling sun you can hang up in your home to cheer on summer.


What you'll need
  • 1 small paper plate
  • yellow tissue paper
  • yellow craft paint
  • white glue or tape
  • One 2 - 3 inch piece of string or yarn
  • 1 paint brush
  • 1 sheet black construction paper
  • 2 wiggly eyes
  • newspaper (to cover and protect your surfaces)


  • If you don't want to use paint, you can also use a marker to color the sun and draw on the sun's face.
  • If you don't have any wiggly eyes you can cut some out of construction paper, or cut out a pair of sunglasses from construction paper for your sun wall hanging.


0 Comments

Paper Portraits

8/19/2012

2 Comments

 
Picture
Total Time 1 2 Hours Ages Preschooler 
Ages: newborn and up

Personalize your child's nursery with a whimsical portrait of one of his favorite people: himself. This colorful design from FamilyFun's Executive Editor Mary Giles offers a contemporary twist to the classic black-and-white silhouette. Best of all, the technique relies on a photograph instead of a model, so there's no lengthy posing required. 

What you'll need
  • Close-up photo of your child's profile
  • Craft knife
  • Scrapbooking paper
  • Glue

How to make it
  1. To make one, take a close-up photograph of your child's profile. Enlarge the image to the desired size on your computer (for an older snapshot, use a copier), print it, then cut out the profile with a craft knife.

  2. Trace the profile on the back of scrapbooking paper and cut it out. Lightly glue the image on another piece of paper and frame it.


2 Comments
<<Previous

    Follow Us


    Share Us


    Subscribe via Email

    Enter your email address:

    Delivered by FeedBurner


    ~ Welcome ~

       I blog about life with a toddler and with my family.I share Recipes,crafts,art work,memorial photos,collages,memorial videos,DIY projects and much,much more!
        I try my hardest to make   detailed, clearly written recipes,reviews & giveaways. Please add me on Facebook, follow me on Twitter and pinterest &  RSS Feed!  I always welcome our readers input.   

    Archives

    March 2013
    August 2012


    Categories
    Crafts for Kids & Adults

    All
    Coffee Filter Butterfly
    Enchanted Spoons And Spatulas
    Flower Headboard
    Funny Lamp
    In-Style In-Boxes
    Magazine Holder
    Make A Planter With 2-liter Bottles & Cd's & The Stone Spray Paint
    No-Sew Pillowcase Skirt
    Paper Portraits
    Pooh's Letter Ladder Wall Hanging
    Rolo Pencils
    Slam Dunk Wastebasket
    Sunshine Craft
    Talking Doorknob
    Winged Wonders
    Winnie The Pooh Paper Lantern


Powered by Create your own unique website with customizable templates.