Follow us
  • Home
  • HOLIDAY GIFT GUIDE! 2018
    • HOLIDAY GIFT GUIDE! 2017 >
      • HOLIDAY GIFT GUIDE! 2016 >
        • Holiday Gift Guide! 2015 >
          • Holiday Gift Guide! 2014 >
            • 2013 Holiday Gift Guide!
  • More About Us
    • HEALTH
    • My Weight loss Journey/the Journey Gym Video Blog
    • Creative Bioscience 90-day-weight-loss-challenge
    • Pregnancy & Infant Loss Remembrance
    • Someone I ♥ has Autism (My Little Girl Amelia)
    • Stop Child and Adult Abuse
    • Memorial Page to Richard Thomas Eagle
  • PR / Media Kit
    • Contact
  • Disclosure Policy
  • My Art Work
  • Crafts / DIY
    • DIY for the home
    • Crafts for Kids & Adults
  • Food & Recipes
    • Breakfast
    • Lunch >
      • Healthy Soups
      • Soups
    • Dinner >
      • Snacks & Side Dishes
      • Crock Pot Meals >
        • Casserole Dishes
    • Dessert & Goodies >
      • Drinks,Soda Fountian & Cool Treats

Talking Doorknob

8/19/2012

2 Comments

 
Picture
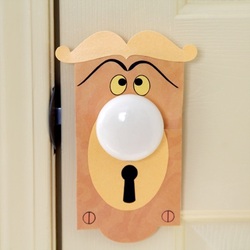
Total Time 30 Minutes Or Less Ages School Age Take it from the talking doorknob Alice encountered in Wonderland, "One good turn deserves another." Made in the whimsical knob's likeness, this colorful paper doorknob plate is a handy prop for surprising your child and reciprocating for past April Fools' pranks! 

Download the Talking Doorknob Template
http://spoonful.com/sites/default/files/april-fools-talking-doorknob-craft-template-0311.pdf 
What you'll need
  • Talking Doorknob Template
  • Scissors
  • Craft or scrapbook paper (black and two shades of yellow or gold)
  • Glue stick
  • Tape or removable glue dots

How to make it
  1. Print the template and use it to cut out the shapes from the specified colors of paper. (Do not cut out the center hole in the doorknob plate yet.)

  2. Glue the keyhole plate to the doorknob plate, positioning it about 2 inches from the top and 1¼ inches from the bottom.

  3. Place the doorknob plate template piece atop the assembled gold paper door plate and now follow the lines to cut out the center hole, as shown.

  4. Fold back the side tab on the plate. Then glue the plate trim in place.

  5. Glue on the keyhole "mouth," eyes, eyebrows, and screws.

  6. Once you've chosen a doorknob to hang the plate on, gently separate the paper at the slit on the side and slide the plate onto the knob base. Then secure the tab to the back of the plate with a removable glue dot.


2 Comments
Jane
3/1/2014 05:34:24 pm

Hello, I love your template but can't access the pdf is there any way you could send it to me as I need it for a school production of Alice in Wonderland? Many thanks.

Reply
Stephanie Mago-Eagle
3/2/2014 12:00:39 am

Here is the template http://a.family.go.com/images/cms/disney/PDFs/april-fools-talking-doorknob-craft-template-0311.pdf

Reply


Leave a Reply.


    Follow Us


    Share Us


    Subscribe via Email

    Enter your email address:

    Delivered by FeedBurner


    ~ Welcome ~

       I blog about life with a toddler and with my family.I share Recipes,crafts,art work,memorial photos,collages,memorial videos,DIY projects and much,much more!
        I try my hardest to make   detailed, clearly written recipes,reviews & giveaways. Please add me on Facebook, follow me on Twitter and pinterest &  RSS Feed!  I always welcome our readers input.   

    Archives

    March 2013
    August 2012


    Categories
    Crafts for Kids & Adults

    All
    Coffee Filter Butterfly
    Enchanted Spoons And Spatulas
    Flower Headboard
    Funny Lamp
    In-Style In-Boxes
    Magazine Holder
    Make A Planter With 2-liter Bottles & Cd's & The Stone Spray Paint
    No-Sew Pillowcase Skirt
    Paper Portraits
    Pooh's Letter Ladder Wall Hanging
    Rolo Pencils
    Slam Dunk Wastebasket
    Sunshine Craft
    Talking Doorknob
    Winged Wonders
    Winnie The Pooh Paper Lantern


Powered by Create your own unique website with customizable templates.