
Total Time 1 2 Hours Ages School Age
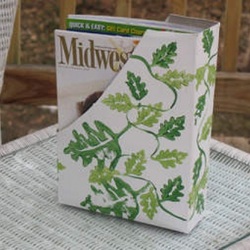
Don't throw away your kids' old cereal boxes! Turn them into attractive magazine holders with this handy Earth Day craft.
What you'll need
1. Any kind of decorating technique can be used. (Decoupage, glued fabric scraps, children can do this!) 2. Try to decorate the front of the boxes so when lined up they all coordinate with each other. 3. Use heavier detergent boxes so the boxes will be sturdier and hold up to younger children messing with them.
How to make it
Don't throw away your kids' old cereal boxes! Turn them into attractive magazine holders with this handy Earth Day craft.
What you'll need
- Empty cereal box
- Scissors
- White acrylic paint or spray paint
- Light green and dark green acrylic paint
- Sponge or leaf shaped foam stamp
- Thin paint brush
- Sand paper or gesso/craft medium (we used Liquitex Basics Gesso)
1. Any kind of decorating technique can be used. (Decoupage, glued fabric scraps, children can do this!) 2. Try to decorate the front of the boxes so when lined up they all coordinate with each other. 3. Use heavier detergent boxes so the boxes will be sturdier and hold up to younger children messing with them.
How to make it
- Cut off top of cereal box. Halfway across top of box, cut at a 45 degree angle down to front of your magazine holder, cut straight across then back up other side at the same angle.
- Lightly sandpaper outside of cereal box. (They are usually shiny, coated paper.) Alternatively you can paint a layer of gesso all over the box. Either one of these methods will help the paint adhere to the box.
- Spray paint the box white, or paint on with inexpensive sponge brush. Let dry.
- Cut out leaf shape from sponge or use a leaf shaped foam stamp.
- Pour out small amount of green paints.
- Use thin paint brush to add a swirled line all over the box, this is the vine.
- Sponge paint (or use foam stamp) green leaves on front of box leading to sides of box. First the darker, for background leaves, then lighter for foreground leaves.
- If painting more than one box, try to connect vines on each box so when set together they will match.
