Follow us
  • Home
  • HOLIDAY GIFT GUIDE! 2018
    • HOLIDAY GIFT GUIDE! 2017 >
      • HOLIDAY GIFT GUIDE! 2016 >
        • Holiday Gift Guide! 2015 >
          • Holiday Gift Guide! 2014 >
            • 2013 Holiday Gift Guide!
  • More About Us
    • HEALTH
    • My Weight loss Journey/the Journey Gym Video Blog
    • Creative Bioscience 90-day-weight-loss-challenge
    • Pregnancy & Infant Loss Remembrance
    • Someone I ♥ has Autism (My Little Girl Amelia)
    • Stop Child and Adult Abuse
    • Memorial Page to Richard Thomas Eagle
  • PR / Media Kit
    • Contact
  • Disclosure Policy
  • My Art Work
  • Crafts / DIY
    • DIY for the home
    • Crafts for Kids & Adults
  • Food & Recipes
    • Breakfast
    • Lunch >
      • Healthy Soups
      • Soups
    • Dinner >
      • Snacks & Side Dishes
      • Crock Pot Meals >
        • Casserole Dishes
    • Dessert & Goodies >
      • Drinks,Soda Fountian & Cool Treats

Flower Headboard

8/19/2012

1 Comment

 
Picture
Total Time 2 3 Hours Ages School Age 
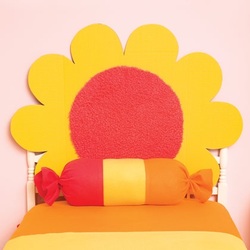
What girl doesn't love a makeover? Give her bed a fresh look with this bright headboard made from a science-fair display board.


What you'll need
  • 36- by 48-inch corrugated display board
  • Craft knife
  • Masking tape
  • Circle of fluffy material for flower center (ours is about 23 inches in diameter)
  • Hot glue
  • Multipurpose plastic ties and adhesive mounting bases (we found ours in Home Depot's electrical supply section)

How to make it
  1. Place the display board facedown on a protected work surface and draw a flower shape. (Tip: We used a 9-inch pot lid as a template for the petals' curved ends.) Cut out the flower with a craft knife.

  2. Apply masking tape along the two prescored lines to keep the flaps stable. Turn the board faceup and affix the fluffy flower center with hot glue. tee "Ataching the Headboards," below.

  3. Attaching the Headboard Attach the cardboard headboard to the posts of your child's existing one using the plastic ties and adhesive mounting bases, as shown. Secure it in at least four places. If your child's bed doesn't have a headboard, you can hang your creation on the wall with screws or nails. 

1 Comment

    Follow Us


    Share Us


    Subscribe via Email

    Enter your email address:

    Delivered by FeedBurner


    ~ Welcome ~

       I blog about life with a toddler and with my family.I share Recipes,crafts,art work,memorial photos,collages,memorial videos,DIY projects and much,much more!
        I try my hardest to make   detailed, clearly written recipes,reviews & giveaways. Please add me on Facebook, follow me on Twitter and pinterest &  RSS Feed!  I always welcome our readers input.   

    Archives

    March 2013
    August 2012


    Categories
    Crafts for Kids & Adults

    All
    Coffee Filter Butterfly
    Enchanted Spoons And Spatulas
    Flower Headboard
    Funny Lamp
    In-Style In-Boxes
    Magazine Holder
    Make A Planter With 2-liter Bottles & Cd's & The Stone Spray Paint
    No-Sew Pillowcase Skirt
    Paper Portraits
    Pooh's Letter Ladder Wall Hanging
    Rolo Pencils
    Slam Dunk Wastebasket
    Sunshine Craft
    Talking Doorknob
    Winged Wonders
    Winnie The Pooh Paper Lantern


Powered by Create your own unique website with customizable templates.